Chicken Legs in the Air Fryer
A whole chicken leg, thigh and drumstick still joined, is a generous and good-value portion, but it is easy to end up with burnt skin and pink meat at the joint. The air fryer cooks the leg gently from every side, so you get crisp skin and fully cooked meat in around 38 minutes. This page is about whole leg quarters, which need a little more time and space than single pieces.
- Temperature
- 180°C
- Total time
- 53min
- Prep
- 10min
- Servings
- 4
- Core temp
- 75°C
- Per serving
- 445kcal
Why the air fryer works for chicken legs
Chicken legs in air fryer baskets are a good way to cook a whole leg quarter without heating the full oven. The leg is a mix of thick thigh meat and a thinner drumstick, and the air fryer's strong, even heat lets the thin end crisp up while the thick end catches up. The result is skin that crackles, with dark meat that falls off the bone.
The real difference from drumsticks or thighs on their own is size. A whole leg weighs around 350 g, so it needs a lower temperature and a longer time, and it needs a basket large enough to hold it flat. If you have a small air fryer, cook two legs at a time. For smaller, quicker pieces, see chicken drumsticks or chicken thighs, and for a whole bird, whole chicken.
How to make chicken legs in the air fryer
Tap a time to start a timer.
- Prepare the legs Pat the chicken legs completely dry. With a sharp knife, make two shallow cuts through the thickest part of the thigh and one on the drumstick. This lets the heat reach the joint.
- Season Rub the legs with the oil, then with the salt, paprika, garlic granules, thyme and pepper. Work some seasoning under the loose skin if you can.
- Preheat and load Preheat the air fryer to 180 °C for . Place the legs skin side down in the basket, with the thick thigh ends towards the edge. A 5 litre basket holds two legs at a time, so a 6 litre or larger machine or two batches are needed for four.
- Cook Cook for , then turn the legs skin side up and cook for another at 180 °C, until the skin is deep golden. For extra crispness, add at 200 °C at the end.
- Check the joint The FSA says chicken is safe at 75 °C for 30 seconds, with no pink meat and clear juices. Push a thermometer into the thickest part of the thigh, near but not touching the bone, and into the drumstick. Thigh meat is tastier at 80–85 °C, so a few extra minutes is fine.
- Rest Rest the legs on a warm plate for , loosely covered, then serve with lemon.
Cooking times and temperatures
| Chicken Legs | Temperature | Time |
|---|---|---|
| Chicken legs, 350 gTurn halfway | 180 °C | 38 min |
| Small legs, 250 g | 180 °C | 28–30 min |
| Large legs, 450 gLower heat for the thick joint | 170 °C | 42–45 min |
| Legs with baking powderAdd 1 tsp to the seasoning | 180 °C | 38 min |
| Legs from frozenDefrosting first is better | 170 °C | 50–55 min |
Times are a guide and depend on the size of the food and the power of your air fryer. Cooked when the centre reaches 75 °C. See also cooking times and temperatures for all dishes.
Tips
- Cook skin side down first. The skin renders and crisps against the hot basket, then the second half of the time finishes it on top.
- Use a thermometer at the joint. The thickest part of the thigh is the last place to cook. If it reads 75 °C or more, the rest of the leg is done.
- Dry-brine for a better result. Salt the legs and leave them uncovered in the fridge for a few hours. The skin dries out and crisps more easily.
Serving
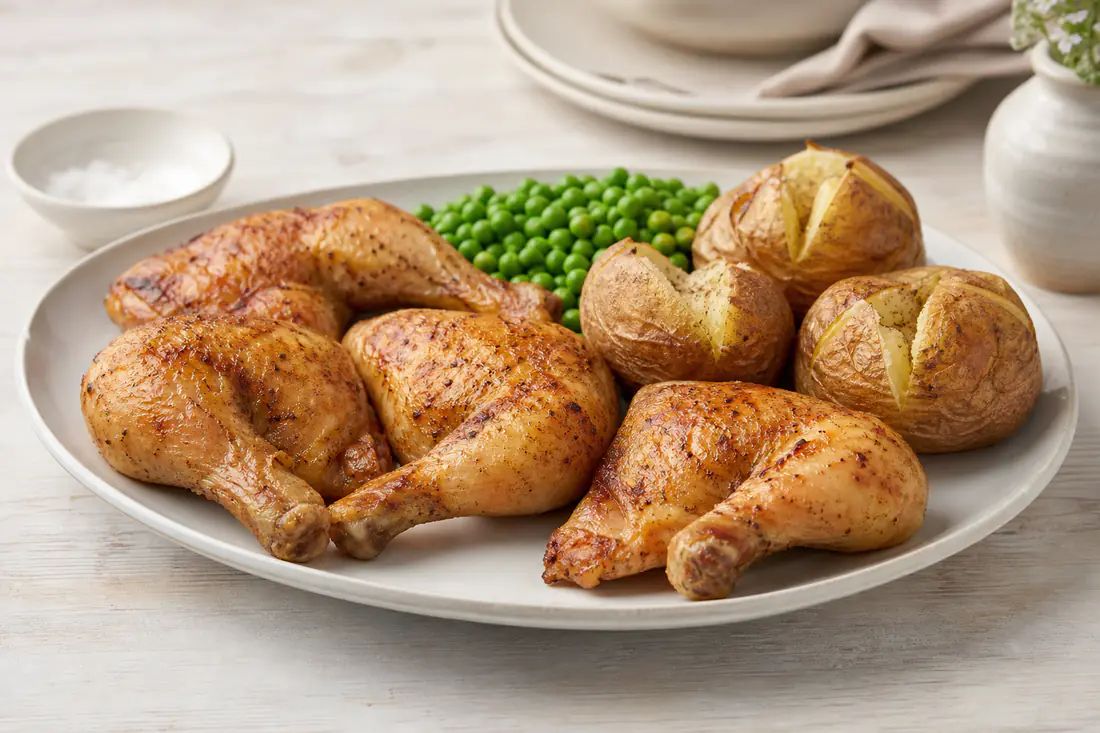
Serve whole chicken legs with a big pile of jacket potatoes or chips and a green vegetable such as broccoli or green beans. For a simple Sunday dinner, add gravy and carrots. The legs also work as the main part of a barbecue-style meal with coleslaw.
Storing and reheating
Keep leftover legs in an airtight container in the fridge for up to 3 days. Reheat them in the air fryer at 170 °C for 8–10 minutes, until steaming hot all the way through (75 °C at the joint). The meat also pulls off easily for sandwiches, fried rice or a salad.
Variations
- Piri-piri legs: Mix 2 tbsp piri-piri sauce with the oil and brush it on before cooking, then a little more for the last 5 minutes.
- Tandoori-style: Marinate the legs for at least 2 hours in 150 g plain yoghurt with 2 tbsp tandoori spice and the juice of a lemon. Wipe off the excess before cooking. This version is not dairy-free.
- BBQ legs: Cook the legs plain, then brush with barbecue sauce for the last 5 minutes at 170 °C so the sugar does not burn.
Troubleshooting
- The skin is crisp but the meat near the joint is pink
- The leg was too thick or went in cold. Take the chicken out of the fridge 20 minutes before cooking, make the shallow cuts and cook for 5 more minutes until the thigh reads at least 75 °C.
- The legs do not fit in the basket
- Do not stack them. Cook two at a time and keep the first pair warm, or separate the leg into thigh and drumstick, which then take about 25 and 20 minutes.
- The skin sticks to the basket
- Starting skin side down helps, but always spray the basket lightly first and let the skin set for a few minutes before you turn the legs.
Frequently asked questions
How long do chicken legs take in an air fryer?
About 38 minutes at 180 °C for leg quarters of 350 g, turned halfway. Smaller legs of 250 g take 28–30 minutes and large ones of 450 g need 42–45 minutes.
How do you cook chicken legs in the air fryer without drying them out?
Keep the heat at 180 °C, not higher, so the inside cooks before the skin darkens. Use a thermometer, and rest the legs for 5 minutes before you cut them.
What is the difference between chicken legs and drumsticks?
A chicken leg, or leg quarter, is the thigh and drumstick joined together. Drumsticks are the lower half only, so they are smaller and cook in about 22 minutes.
Can you cook chicken legs from frozen in the air fryer?
It is better to defrost them in the fridge overnight. If you must cook them from frozen, use 170 °C for 25 minutes, then 180 °C for 25–30 minutes, and check that the thigh reaches 75 °C.
Do I need foil or oil?
No foil is needed. A tablespoon of oil rubbed over the skin helps the seasoning stick and gives better colour, but the fat in the skin does most of the work.
Rate this recipe
No ratings yet. Be the first to rate this recipe.